Visualize Conditional Access Policies using PowerShell
Conditional Access Policies and MS Graph
Conditional Access Policies are an important part of most AzureAD environments. They allow to protect apps and data, by e.g. enforcing Multi-Factor Authentication or by restricting unneccessary access.
You can interact with Conditional Access Policies using MS Graph via the /identity/conditionalAccess/policies resource to create, read, update, delete individual policies.
Conditional Access Policies are represented as JSON documents in MS Graph - as described in the MS Graph documentation - conditionalaccesspolicy.
Interact with PowerShell
PowerShell allows to interact with MS Graph using Invoke-RestMethod, but you still have to handle things like authentication, pagination etc.
To make life simpler for myself, I wrote some functions a into a MS Graph wrapper module MEMPSToolkit, incl. handling Conditional Access Policies.
Assuming you have the module installed, let’s authenticate to Graph first - this time using a Service Principal / clientId and clientSecret. You will need to grant Policy.Read.All permissions to this AppRegsitration / Service Principal to be able to read Conditional Access Policies.
$token = Get-AppLoginToken -tenant "contoso.com" -clientId "123..." -secretValue "!?#..."
$token stores your bearer token for the actual requests. Now we fetch all Conditional Access Policies.
$CAPols = Get-ConditionalAccessPolicies -authToken $token
This will give you an array of policies. Let us grab one of them and print the JSON. (I will truncate the ids - hope you understand.)
$CAPols[0] | ConvertTo-Json -Depth 10
{
  "id": "74fd.....",
  "displayName": "Legacy 1 - Block legacy auth",
  "createdDateTime": "2020-11-11T08:24:36.5080147Z",
  "modifiedDateTime": "2021-06-21T10:11:58.5866907Z",
  "state": "enabled",
  "sessionControls": null,
  "conditions": {
    "userRiskLevels": [],
    "signInRiskLevels": [],
    "clientAppTypes": [
      "other"
    ],
    "platforms": null,
    "locations": null,
    "applications": {
      "includeApplications": [
        "All"
      ],
      "excludeApplications": [],
      "includeUserActions": []
    },
    "users": {
      "includeUsers": [
        "All"
      ],
      "excludeUsers": [
        "ff2a0....",
        "acf0a....",
        "9f0a0...."
      ],
      "includeGroups": [],
      "excludeGroups": [
        "4f095...."
      ],
      "includeRoles": [],
      "excludeRoles": []
    }
  },
  "grantControls": {
    "operator": "OR",
    "builtInControls": [
      "block"
    ],
    "customAuthenticationFactors": [],
    "termsOfUse": []
  }
}
Create a diagram
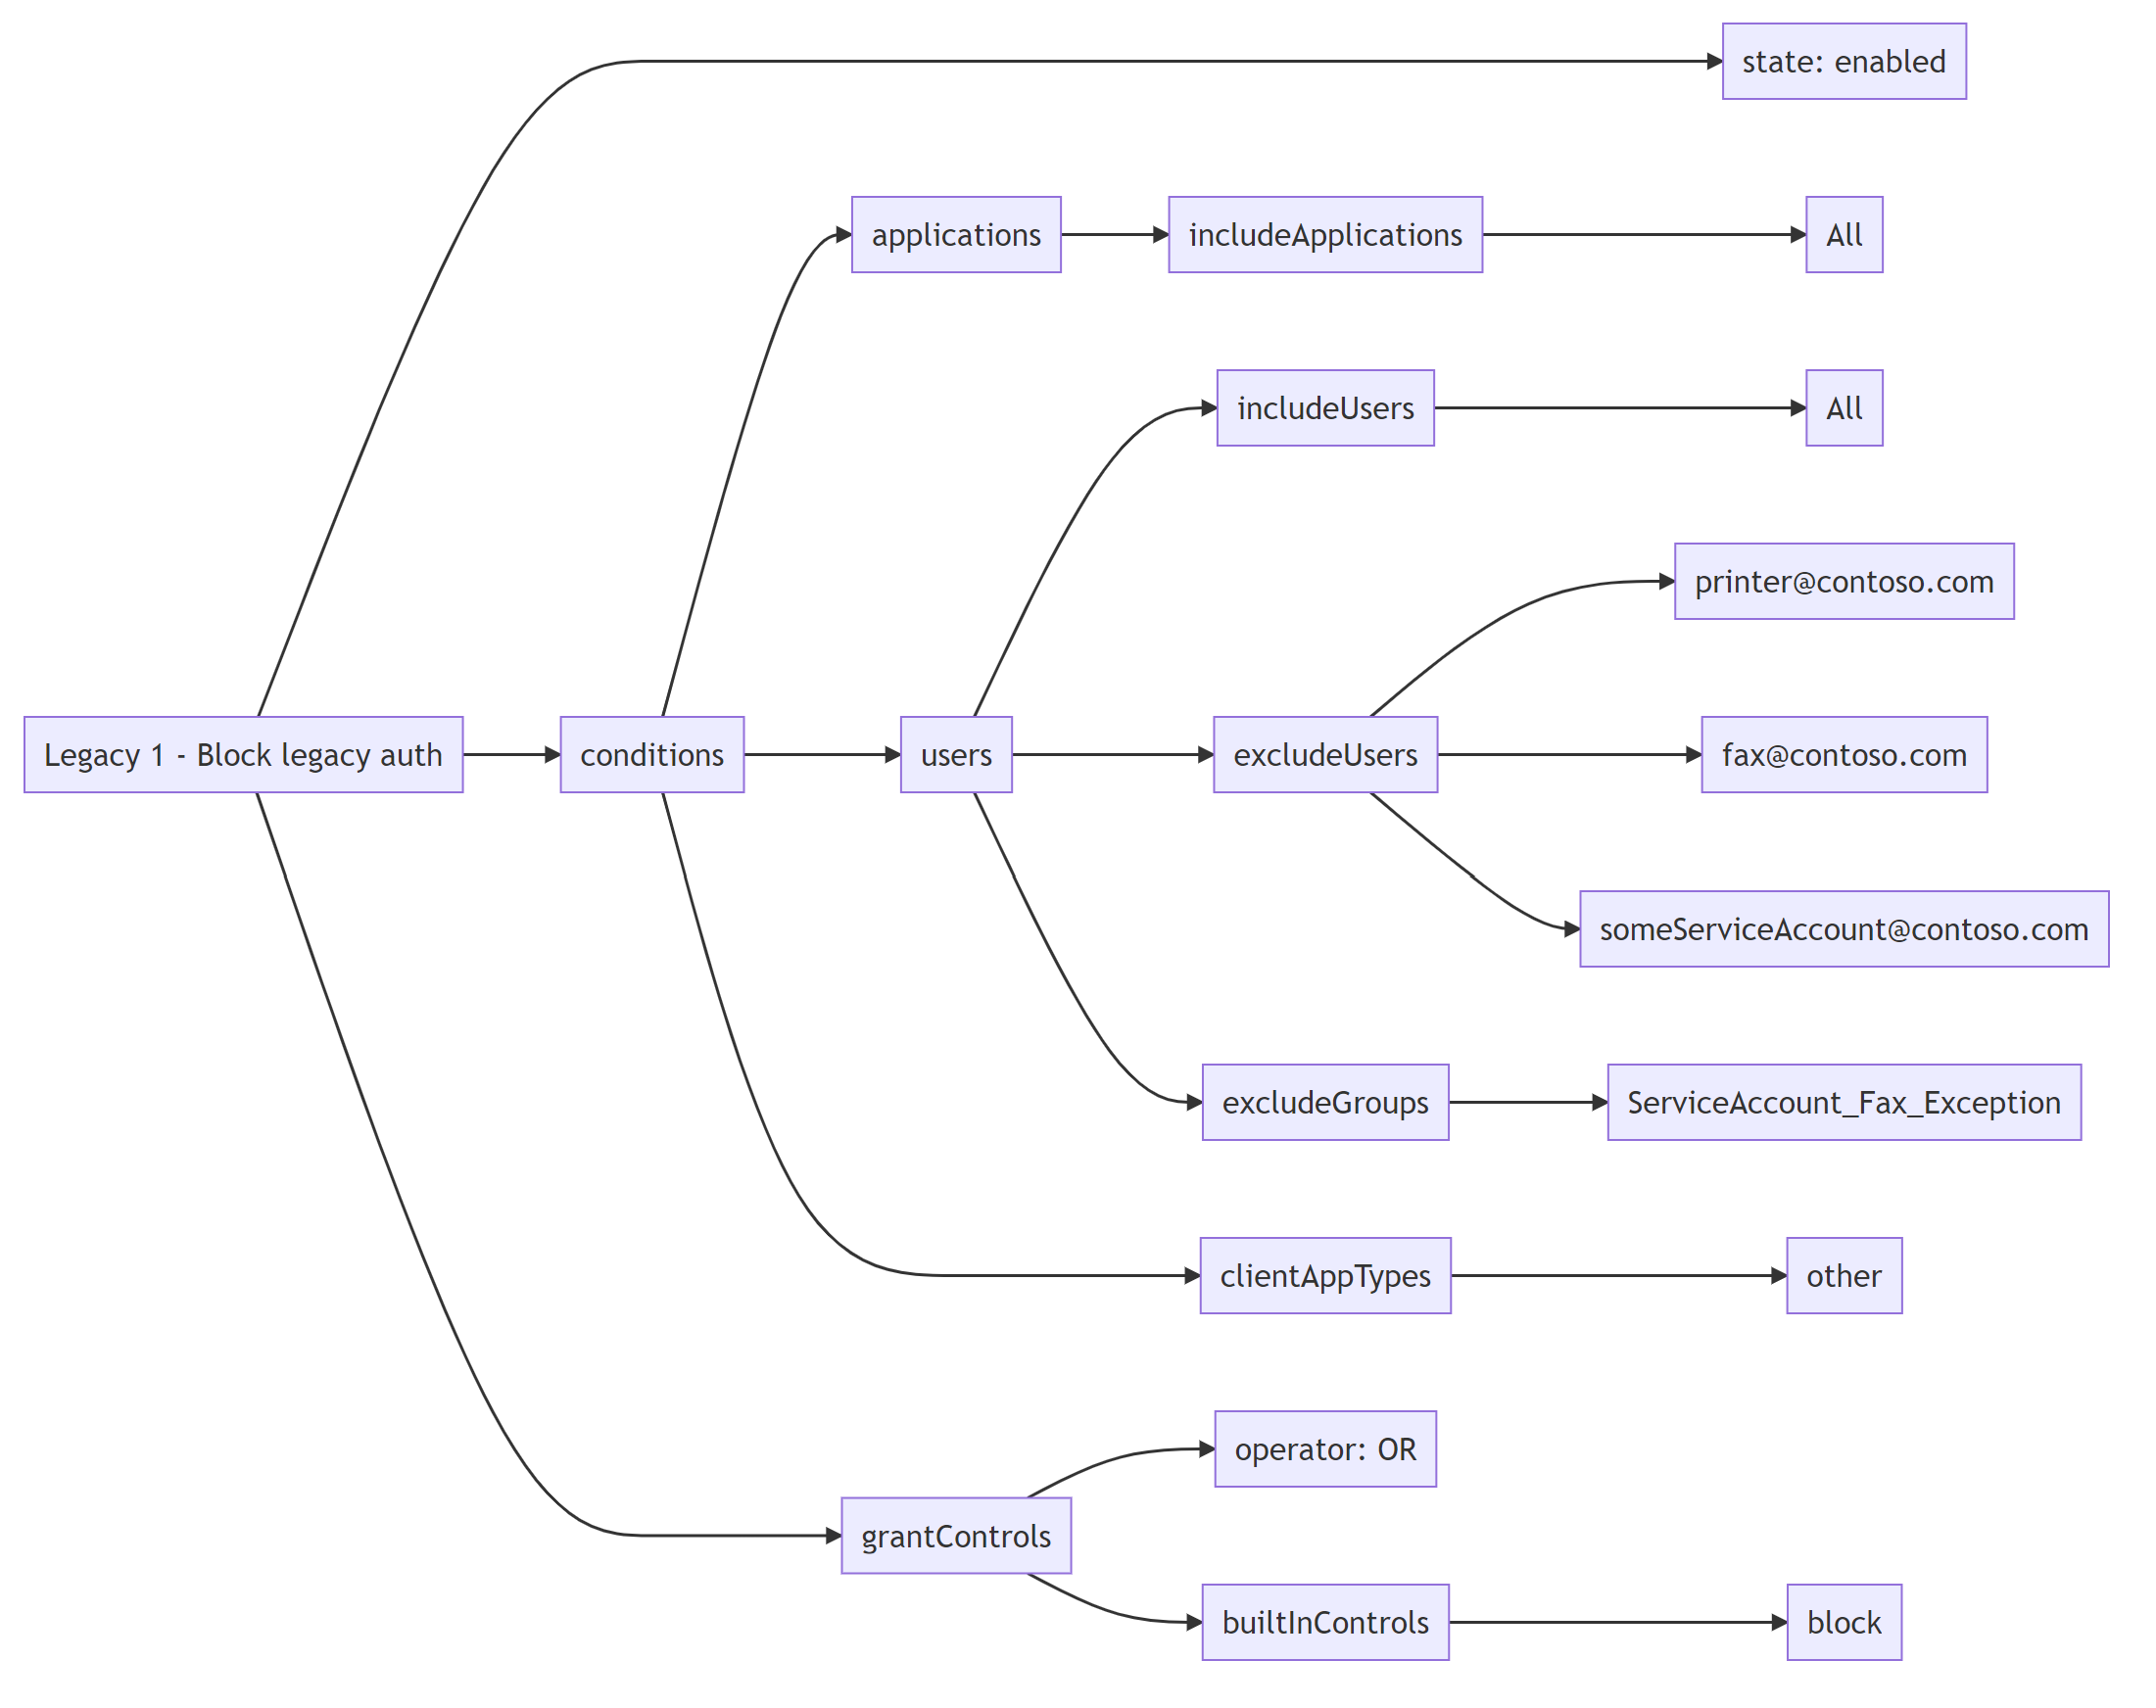
Hmm. This is hard to read, as users, groups, roles and apps are referenced by their MS Graph object ids.
So I wrote a parser / interpreter Write-ConditionalAccessPolicyToMermaid :D
It will
- resolve all object names
- truncate empty settings/nodes
- pretty print the whole thing into a Mermaid diagram
Write-ConditionalAccessPolicyToMermaid -pol $CAPols[0] -asHTML $false -asMarkdown $false -authToken $token
graph LR;
id["Legacy 1 - Block legacy auth"] -----> state[state: enabled]
id --> conditions
conditions --> applications
applications --> includeApplications
includeApplications --> a_All["All"]
conditions --> users
users --> includeUsers
includeUsers --> u_All["All"]
users --> excludeUsers
excludeUsers --> u_ff2a0...["printer@contoso.com"]
excludeUsers --> u_acf0a...["fax@contoso.com"]
excludeUsers --> u_9f0a0...["someServiceAccount@contoso.com"]
users --> excludeGroups
excludeGroups --> g_4f095...["ServiceAccount_Fax_Exception"]
conditions ---> clientAppTypes
clientAppTypes --> other
id ---> grantControls
grantControls --> grantControlsOperator[operator: OR]
grantControls --> builtInControls
builtInControls --> bic_block[block]
Write-ConditionalAccessPolicyToMermaid takes two boolean parameters telling it which kind of output to produce; -asHTML and -asMarkdown. If you set both to false, it will create naked Mermaid (.mmd) output. Just pipe the output into a file to store it.
The output by default is Mermaid wrapped in HTML (-asHTML set to true), which will use JavaScript to render in your browser.
If you ommit -authToken, names will not be resolved, but the object ids will be used.
The rendered result looks like this:

UPDATE / Batch processing
If you want to export/visualize all your policies at once and automatically create appropriate filenames, have a look at ConditionalAccessVisualizer.
Additional tooling
If you need to create PNG, SVG or PDF output from Mermaid, you can install/use mermaid-cli.
Mermaid-cli is written using Node.js, so to install Node.js on Windows, e.g. use WinGet
winget install -e --id OpenJS.NodeJS
If you don’t run Windows, or don’t use WinGet, go to NodeJS.org and download the distribution fitting your needs.
Now that we have Node.js set up, install Mermaid CLI using npm:
npm install -g @mermaid-js/mermaid-cli
Now you convert Mermaid (.mmd) or Markdown (.md) containing the diagrams into your desired format:
mmdc -i diagram.md -o diagram.png